Thursday, April 15, 2010

New in the shop!


Inspired by the dogwood trees that are blooming in my yard!

Sunday, February 28, 2010

New for spring!

Friday, February 05, 2010

Home grown sprouts


A recent trip to my local grocery store left me super disappointed when I was searching for fresh sprouts to add to my sandwiches. I thought they should be pretty easy to grow yourself. So I started surfing the web and sure enough you can make sprouts right on your windowsill, using all sorts of regular dried beans.

I came across this website classbrain and followed the directions, using a glass mason jar to sprout my lentils.

I bought just a regular 1 pound bag of my store brand's lentils. I was surprised how quickly the lentils started to sprout. By day six I had about 2 one inch sprouts coming from each bean, that tasted crisp and fresh. I couldn't ask for a better tasting sprout! (Click the photo above to see my process larger)

From what I've read, lentils are a fantastic source of B vitamins, calcium, magnesium, zinc and much more. Since you can eat sprouts raw, you retain all of that incredible nutritional value, which is an A+ in my book!

The only thing I would do differently next time, is maybe buy organic lentils in bulk. I'm thinking a better quality bean might grow a heartier and longer sprout. I'm also thinking of now investing in a fancy schmancy sprouter, since this was so easy to do!

Below is a close up of day 3 when the lentils began to sprout, and day 6 when the sprouts were ready to eat!


Let me know how your lentil sprouting goes! ♥

Monday, February 01, 2010

Homemade Pop Tarts! (Vegan)

Okay, so I LOVE pop-tarts, who doesn't? I don't however love that they are filled with HFCS, artificial colors and flavors. So I thought I would make my own, I know ambitious right? heh heh. I was searching different recipes online and most were vegan, so I came up with this recipe that is sure to please anyone!


Ingredients ~

Dough
2 cups all purpose flour
1/2 cup veggie oil
1/2 cup ice cold water
1 tbs sugar (optional)

Filling
All fruit spread or preserves, preferably strawberry

Icing
1/2 confectioners sugar
1 tsp water
1 tsp of the above filling
Rainbow sprinkles

Directions
Mix flour and sugar with fork. Stir in oil and water, whisk with fork to thicken.
Pour in flour and mix with fork. Roll out dough 1/4 inch thick and cut roughly into 10 - 2 1/2 x 3 1/2 inch rectangles. You can make them square if you wish or use your favorite cookie cutter shape. I wanted them to resemble real pop-tarts, so I left mine rectangleish. This should make about 5 tarts.

With a spoon put a dollop of your fruit spread in the middle of each rectangle, leaving about a 1/4 inch all around the sides. With your finger dab a little water on the edges and place another rectangle dough on top, pressing the sides down to seal. Take a fork and dip it in a little flour and press all four sides closed, making a nice seal. With a tooth pick, poke little vent holes on top.
Bake at 400F until for about 15 minutes or until the edges turn a nice golden brown. Let cool completely before icing.

To make the icing mix all the ingredients together until smooth, and more water if needed. Spread thinly over your tarts, and add sprinkles. Eat and enjoy!


I hope you liked this recipe as much as I did, is was a nice little treat for me on a cold and snowy Monday!

Thursday, January 28, 2010

Pitas and Falafels

I realize that most of my posts lately have been about food, but I can't help it, I'm preggo and preggo ladies like to eat :)

pita bread

falafel


I've still been on the chickpea kick lately, so I whipped up some delicious falafel burgers on homemade pita bread. The bread was actually really easy to make, I don't think I'll ever buy it again. I used plain all purpose flour for mine, and found the recipe here.

For the falafel burger I pretty much winged it, once I have a nice recipe I'll share. I roughly used this recipe and added rolled oats and bread crumbs.

Anyway it definitely curbed my cravings, so this preggo lady is full and happy!

Sunday, January 03, 2010

Yummy Hummus!


Now that I'm preggo with number 2, all I've been craving is hummus! I have never been a fan of store bought hummus, so I always make my own.

Here is my favorite basic recipe...

1 can (15oz) Chickpeas, drained but reserve 1/3 cup of liquid
1 tbl Olive Oil
1/2 - 2 tsp Cumin
1/8 tsp chili powder
1/4 tsp salt
Fresh ground pepper

Cumin is the main ingredient for hummus to taste like hummus, I use it sparingly though so I would suggest starting out with 1/2 tsp and then adding more to your liking.

Put all the ingredients in a food processor or blender and pulse, add the reserved chickpea liquid and blend until smooth & creamy. Serve with homemade pita or tortillas chips. Or spread in a half pita with some sprouts and roasted red peppers, for a delicious & healthy sandwich!

You can add to this basic recipe to make different flavors of hummus. I sometimes add a 1/4 of cooked black beans and a clove of garlic, for a great tasting black bean hummus. Or you can add sun dried tomato paste and fresh basil. The possibilities are endless!

For the chips, I use about 3 white corn tortillas cut in eighths, coat lightly with one tsp olive oil and sprinkle with sea salt. Spread them out on a cookie sheet, and then bake for about 15 minutes at 350 until crispy. Alternatively you can make these chips with wholegrain flour tortillas or pita bread too, so good!

Enjoy ♥

Tuesday, November 03, 2009

Pumpkin Soup

Oh how I love Fall and the cooler weather. It makes me in the mood for warm soup in bread bowls, stripey socks, and wool scarves.

Here's a soup I made recently, that was oh so good!


Creamy Pumpkin Soup

2 tbsp. butter
2 tbsp. flour
1 tbsp. olive oil
2 cups mashed cooked fresh pumpkin
1 1/2 tsp. ground ginger
1/4 tsp. nutmeg
1 tsp. salt
1/4 tsp. ground pepper
3 cups chicken broth
3/4 cup half and half or milk
Sour Cream

Put cooked pumpkin, salt, ginger, nutmeg, olive oil, and pepper in a blender or food processor. Slowly add in chicken broth and blend together until smooth. In a large sauce pan melt butter and flour to create a roux. Slowly pour in half and half and then stir in pumpkin mixture. Simmer on low until soup starts to feel thick. Serve hot with a dollop of sour cream and garnish with roasted pumpkin seeds with a side of crusty bread. Serves 4-6.

~ I bought a pumpkin pie pumpkin or sugar pumpkin from the grocery store, it was about 6 inches in diameter, and yielded about 2 cups of pumpkin once cooked. Pumpkin pie pumpkins are very hard to cut into! I actually put the entire pumpkin in my stock pot and boiled until the skin was soft. Then I cut the pumpkin in half and scooped out the seeds (roasted them later) the pumpkin came off the skin perfectly!

Friday, September 25, 2009

Free Alphabet Poster

I don't have a whole lot of money to decorate my kids room, let alone my whole house, so I've come up with some fun and cheap ideas to make mi casa all fancy like over the years!

I've been drooling over some gorgeous alphabet prints over at Etsy for my son's room.

I especially love petitcollage's Animal Alphabet Silkscreen Poster and pennypeoples's Alphabet Print.

Both of these prints inspired me to come up with my own alphabet collage to adorn my little ones wall...

Alphabet Poster

I printed this out with my regular ink jet printer and slapped a $5 Walmart frame around it, and whoo hoo instant art!

I made this print in 6 different colors, so you can print them out too.

alphabet poster colors

The size of the poster is 8x10 inches, just click the link below to see the original size, then right click to save to your computer and print.

Brown
Green
Teal
Orange
Pink
Purple

Enjoy! ♥

Tuesday, September 01, 2009

New items!

Please check out our new items at the Etsy Shop!

fall_heyday

Sunday, July 19, 2009

DIY Clothespin Holder

I recycle as much as I can, but sometimes there's that inevitable What the heck can I do with this?! moment. For example, I've been hanging on (no pun intended) to this small plastic hanger that was part of some packaging that I received...


It was too small to use for clothing, and it wasn't made out of recyclable material, ie no number 1's or 2's on it. (That's all we can recycle here in Charlotte)

I knew that I could do something with it and then it came to me...

clothespin_holder

Below are directions to make you own clothespin holder, with a good ol' wire hanger :)

------------------------------------------------------------

Materials Needed:


1/4 yard *cotton fabric. One main color and one complimentary color for lining
Matching thread
Wire hanger
Wire cutters
Clothespins

*If you are going to keep your clothespin holder outdoors, I would suggest making it out of oil cloth

------------------------------------------------------------

Directions:

1. Cut off the top of your hanger with wire cutters, set aside.

cp1

cp001

3. Print pattern piece by clicking the picture below.


4. Cut out two 8x10 inch pieces of fabric from your main color and two pieces for the lining.

5. On the wrong side of one main fabric piece and one lining piece, trace and cut out opening from both pieces of fabric. Satin stitch both pieces together, wrong sides facing, along the raw edge to keep from fraying.

6. Pin all pieces of fabric together, with main color pieces facing right sides together. Sew all around the edge with a 1/4 inch seam allowance, leaving about a 1 & 1/2 inch opening at the top as shown.

cp2

cp3


7. Square off your bottom corners by sewing straight stitch about 1/2 inch from the corner. Turn right side out. (I pinked my edges, but you can leave them raw)

cp5

8. Insert wire hanger top and fill with clothespins.

cp4

cp

Hang on your clothesline and enjoy!

Sunday, July 12, 2009

Lie Barry

Oh I love the local library, especially when you can "order" the book you want online and your local library will email you when it's ready to be picked up! Yeah, I'm lazy like that! ;p

Anyway, one of the recently rented library rags that I picked up is Beyond-the-Square Crochet Motifs.
Wow there are some beautiful motifs in this book, I didn't know where to start, I wanted to make all 144 of them!

So I broke out some of my cotton crochet thread, a teeny tiny crochet hook, and made some motifs into necklaces...

Motif #143

A different Colorway

Motif #143


Whatta ya think? ♥

Thursday, June 25, 2009

Rag Rug Finished!

I finished that rag-rug I was working on, it came out to be about 24 inches wide. Now I making one for our little guys bathroom in red & white to match his Dr. Seuss theme he has going on in there!

rag-rug finished


rag_rug_complete

I never did get around to making that tutorial video either, but I did come across these fabulous blogs that will help you (if you are so inclined) in making a rag rug for yourself!

Rag Rug Cafe - Great site with videos if you don't know how to crochet but would like to make a traditional rag rug using the toothbrush method

Moda Bake Shop - How to make a braided rag rug - super easy!

Craft Stylish - A fabulous blog & post on how to crochet (or knit) with fabric!

Enjoy ♥

UPDATE:
Here is my rough pattern, ymmv! I used a Boye size Q 15.75mm hook and my fabric strips were about one inch wide.

dc= Double crochet

Chain 4, join to form a ring

1st round - ch3 (acts as first dc) 9 dc crochet in the ring, join (10 stitches)

2nd round - ch3, 1 dc crochet in the first stitch, 2 dc in each of the other stitches, join (20 stitches)

3rd round - ch3, 2 dc crochet in the first stitch, 1 dc crochet in the next, repeat, join at the end (30 stitches)

4th round - ch 3, 1 dc crochet in the first stitch, *2 dc crochet in the next stitch, 1 dc in the next stitch, repeat from *, join(40 stitches)

5th round - ch3, 1 dc in the next 2 stitches, 2 dc in the next, *1 dc in each of the next 3 stitches, 2 dc in the next stitch, repeat from *, join (50 stitches)

6th round - ch3, 1 dc in the next 3 stitches, 2 dc in the next, *1 dc in each of the next 4 stitches, 2 dc in the next stitch, repeat from *, join (60 stitches)

7th round - ch3, 1 dc in the next 8 stitches, 2 dc in the next, *1 dc in each of the next 9 stitches, 2 dc in the next stitch, repeat from *, join (72 stitches)

8th round - 1 dc in each stitch around, join fasten off, weave in ends

If you want a bigger rug, repeat rounds 3-7 until you gt your desired size, always end your rug with a single row of dc/hdc/sc (or any decorative stitch) all around.

Monday, June 15, 2009

Got Ravelry?

I've known about Ravelry for some time now, but never joined. Why didn't you twist my arm and make me join? Now I'm super addicted, what a great community. I'm neesypea over there too, so add me ok?

One of the things I've been working on is a crochet rag rug....

Crochet Rag Rug

fabric ball for rag rug

It's for my downstairs bathroom, which is painted a deep sky blue (the people who lived here before us, painted it that color), and I added apple green as an accent color.
I keep running out of fabric though. It took a lot more fabric strips than expected, but I'm determined to only use what I have, so we'll see how it turns out!


I'm working on a rag-rug crochet pattern and video on how to prepare your fabric strips, to share with all y'all as well! Stay tuned!!

Sunday, April 26, 2009

Plush Owl Pattern

Update: 04/26/2011 New Pattern added!

Owl Body ----> Here

Owl Parts ----> Here

Owl Parts Placement ----> Here

Instructions ----> Here

Hey all, I've decided to add a new segment of sorts to this ol' blogaroo!

I will try post a pattern or tutorial for a super sweet craft project every month (or so), just for you!

First installment, a plush owl pattern... :D

Plush Owl Pattern
copyright www.HeydayFashion.com
FOR PERSONAL USE ONLY NO RECREATING FOR RESALE


pink_fluff_owl


Materials Needed

Main Fabric: Faux fur, minky, fleece, felt, or printed Cotton ~ 1/4 Yard
Contrasting Fabric ~ 1/8 Yard
Craft or Wool Felt
Buttons or Doll Eyes
Fiber Fill
Matching Thread or Invisible Thread

Instructions

1. Print out owl pattern onto card stock or paper and cut pieces out.

2. Trace the pattern with fabric pen or pencil, onto the wrong side of fabric.

3. Cut out main body and wing pieces from fabric.

4. Trace and cut out eye pieces onto contrasting fabrics.

5. On one piece of the main body fabric (right side up), pin outer eye pieces in place, *top stitch into place.

6. Pin inner eye on top of the outer eye pieces, *top stitch into place.

*You can also glue the eyes into place, if desired.

7. Sew buttons or add plastic doll eyes in the center of the fabric eye pieces for added character.

8. Place beak in the middle of the eyes, pin, and top stitch or glue into place.

9. Sew the wings, right sides facing, leaving one side open as shown. Turn wings right side out
Pin wings in place as shown, match up the raw edges to the sides of the opening on the wings, to the main body and pin into place.

10. Match up body pieces, right sides facing, and pin together. Sew along the edge, leaving a 1/4 inch seam allowance and a one inch opening at the bottom as shown.
Remove pins, clip excess fabric and notch curves, turn right side out. Stuff generously with fiber fill. Hand sew bottom opening with matching thread or invisible thread.

Enjoy your cute plush owl!

If you made this project, please be sure to let us know! Link back here or upload your cute creation to our Flickr Pool

xo
Neesy Pea

Thursday, April 16, 2009

Pinafore - Popover

I came across a cute little vintage pattern from a 1970s craft book I collected from a thrift store. I tweaked the pattern slightly and came up with these, it would fit a 12-18 month old. I tried to model it on my 11 month old son, but he wouldn't have it! lol...they are both reversible.

reversible pinafore-popover 12-18m size

purple-pinafore-popover

I thought that maybe I would like to make one of these in a "big" girl size for me, kinda like an apron, and I found this awesome crafty mama's pinafore tutorial here, so I may have to give this a go too!!

Thursday, February 19, 2009

Dutch Oven Bread


dutch_oven_bread1
Originally uploaded by neesypea
My Mother bought me a Dutch oven as an early birthday gift. I christened it by making some No Knead Crusty Bread. It’s cooling right now! I can’t wait to devour it!

dutch_oven_bread2


I'm usually horrible and making bread, it's either too dense or not done enough inside. This bread came out picture perfect and so so delish!!

Tuesday, January 20, 2009

Snow Cream!

It's snowing today in Charlotte, NC! So I had to make Snow Cream!

snow cream

snow cream
It tastes great, like a lighter version of vanilla ice cream, I bet it would be good with chocolate chips also! :D

Tuesday, January 06, 2009

Laundry Soap

I like being frugal and I try hard to come up with ways to be more economical as well as saving money. I recently was introduced to the process of making your own laundry detergent. I received a sample and was hooked. I had to try to out for myself, and boy is it easy and cleans just as good as the commercial stuff.


There are loads (no pun intended) of "recipes" out on the net for making your own laundry detergent, just Google it and you'll see what I mean.

The three basic ingredients for making home use laundry detergent are Borax, Arm & Hammer Super WASHING soda and a bar of soap. Now the Borax is super easy to find, it's usually in a box by the rest of the household cleaners at any major supermarket or big discount store. The Washing Soda is a little harder to find, your best bet is to call around before trying to find it or order some from the Internet, and no baking soda is not the same.

The bar soap varies on personal preference, really you can use anything, though most recipes call for a laundry bar soap. There is Fels Naptha, Octagon, and Zote (dollar stores) which are all high contenders in the homemade laundry detergent set.

I used Kirks Castile, which is a natural soap made with coconut oil and has a nice clean scent. I have read that the other bar soaps that will work for your soapy endeavors include Pure & Natural (3 bars for a buck at Walmart), and Ivory. You can even try even nice scented soaps like Toms of Maine or Mrs. Meyers, the possibilities are endless. I've even read that you can also use a little essential oil to boost your linens in to high scented gear, if you so desire.

If you can't find any of the basic soap making ingredients at your local grocery, try buying from this site,
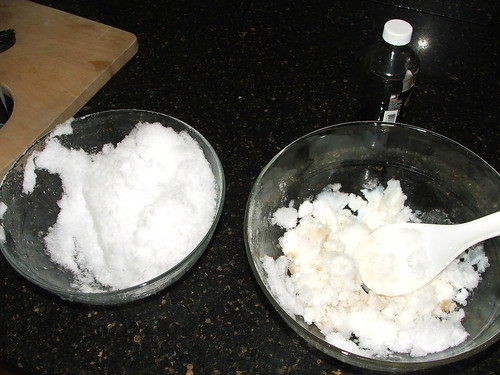
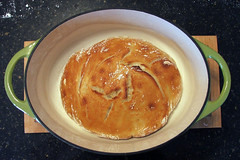
 Soaps Gone Buy

Below is the soap I made in dry form. You always want be careful when making your own soap, do not inhale or ingest any of this and be careful around kids and pets.

1 Cup of Arm & Hammer Super Washing Soda
1 Cup Borax (Any brand will do)
1 Bar Kirks Castile Soap, grated


The hardest part, and really it's not hard at all, is grating up the bar soap. I had a hand grater that worked perfectly. You can also use a regular cheese grater or even your food processor if you wish, just make sure to thoroughly clean all your components before using them again on food. Once the bar soap is fully grated, combine together with the borax and soda. I poured my soap into a ball jar and am now ready to start washing. That's it, your done, that took maybe 15 minutes! I still have enough borax and soda to make about three more batches, and all it would cost me is the price of another bar of soap. Easy peasy.

Now, I know what your thinking, how well does it work? It works great my friend, great! You only need one tablespoon for a normal load, maybe two if you have some really dirty duds. This soap dosen't suds up like regular commercial brands (which is great if you have an HE machine) so I was a bit skeptical at first. But everything came out nice and crisp with a slight clean scent. You can even add 1/4 cup of white vinegar to your rinse cycle to make you clothes super soft!

You can make your own laundry soap in liquid form too. Here is a link from the Simple Dollar on how to do so and here is a great video that shows the process amazingly well!

If you don't think you are brave enough to make your own laundry detergent, I recommend buying from this site Simply Clean Ok. I've tried this soap and it's quite lovely if I do say so myself!

Enjoy and go make some soap! Next up, felted wool dryer balls :)

Friday, January 02, 2009

Consumer Products Safety Improvement Act

"This plush is Art for Art's sake, not intended as a toy."

I changed things up a bit with one of my best selling plush TOYS.

I hope we can change things!

Save Handmade, please. Help spread the word that handmade is OK!!

Wednesday, November 12, 2008

Homemade Organic Applesauce

My neighbor gave me this huge bucket of apples from her tree, so of course I had to make applesauce!

I used this recipe ...
http://www.pickyourown.org/applesauce.htm

I haven't canned any yet. I left the skins on too, and the applesauce turned pink, but it was sure yummy. I'm going to make baby puree to freeze next, but I'll take of the skins first.

I'm not sure what kind of apples they are, my neighbor didn't know either, I did a Google search I think they might be Rome or Arkansas Black apples.

Yummy Homemade Organic Applesauce!

It was fun, but the applesauce came out super thick! I think it was because I only have the food grinder attachment for my kitchenaid and I actually need the fruit and veggie strainer as well.